Subscribe For Free Updates!

We'll not spam mate! We promise.

Showing posts with label WIDGETS. Show all posts

How to add CSS Stylish Navigation Menu On Blogger Blog

Hello Friend!Our previous article is on How to add the author bio widget in blogger blog So today our article is on how to add this stylish Navigation bar in your blogger blog.If the primary navigation on your site or blog doesn’t provide enough space for putting all links, then this secondary CSS menu will allow you to put a lot of links in it.This navigation bar is made up of HTML and CSS no JavaScript is use in it.Many Professional blogger use Navigation menu for blogger.because adding navigation menu to your blogger blog make the visitors to quickly get the required content what they want.So many people need this.Thatswhy i designed this stylish navigation menu for your blog.Follow some simple steps inorder to at this navigation menu in your blog.


navigation menu

HOW TO ADD THIS NAVIGATION MENU ON YOUR BLOGGER BLOG:

  • Login to Blogger > Dashborad
  • Click on Drop Down Menu and select Template
  • Backup your Template before making any changes to your blog
  • Press CTRL+F and search the code shown below.
  • ]]></b:skin> 
     . Paste below code just above it.


    <style>
    #navbarmenu ul{
    margin: 0;
      padding: 0;
      list-style-type: none;
      width:700px;
      position: relative;
      display: block;
      height: 50px;
      font-size: 12px;
      font-weight: bold;
      background:black;
      border:3px solid #2aa4cf;
      }
    #navbarmenu li{
     float:left;
     padding:12px
     margin:0px;
    }
    #navbarmenu a{
    color:#2aa4cf;
    font-size:20px ;
    padding:20px;
    line-height:50px;
    text-decoration:none;
    }
    #li1 a:hover{
    padding:12px;
    color:white;
    background-color:#FDB305;
    clear:both;
    }
    #li2 a:hover{
    color:white;
    background-color:#AF05FD;
    clear:both;
    padding:12px;
    }
    #li3 a:hover{
    color:white;
    background-color:#FD05D0;
    clear:both;
    padding:12px;
    }
    #li4 a:hover{
    color:white;
    background-color:#058DFD;
    clear:both;
    padding:12px;
    }
    #li5 a:hover{
    color:white;
    background-color:#FD3B05;
    clear:both;
    padding:12px;
    }
    </style>
    .LAYOUT –> ADD A GADGET –> HTML/JAVASCRIPT 

    .Copy the below code for and paste it there.

    <body>
    <div id="navbarmenu">
    <ul>
    <li id="li1"><a href='#'><span>HOME</span></a></li>
    <li id="li2"><a href='#'><span>SERVICES</span></a></li>
    <li id="li3"><a href='#'><span>ABOUT US</span></a></li>
    <li id="li4"><a href='#'><span>CONTACT US</span></a></li>
    <li id="li5"><a href='#'><span>HIRE US</span></a></li>
    </ul></div>
    .Now Save Your Template

    IF you have any Problem regarding this Menu then ask me in Comment section.

    Enjoy
    You are Done!! 

    How to add Author Bio Widget Under Every Post of Blogger

    Hello friend!Our previous article is on How to add notification bar on blogger So today our article is on How to add author bio widget under every post of your blogger blog.This widget is made up of HTML and Css.Many Bloggers wants the new and fresh widgets of blogger and most of the saying we want new author bio widget So i designed this widget This widget is for Blogger users only as WordPress has various plugins to deal with author boxes.I am happy to develop this author bio profile widget for bloggers. You have seen this widget in many WordPress blogs but implementing on blogger is very difficult. I was busy in this widget for last 20 hours to give a cool and Simple stylish look. Now, I have developed this author bio widget for your blogger blog. As my coding skills, i has tried to minimized the style sheet code.

    HOW TO ADD THIS AUTHOR WIDGET TO BLOG:-


    How to add Notification Bar To your Blogger Blog

    Hello Friend How are you hope you will fine So Today our post is on How to 
    add Notification bar to blogger Blog.Basically designing a blogger blog is much easier now days Every blogger design her blog with awsome coding. So Today we are releasing a fancy style blue color notification bar for your blogger blog.Notification bar is not for blogger by default but as I told you that
    developers has created many things for blogger and this Notification bar is created by me.this bar shows manually specified links, so you can add or remove links to it manually according to your needs.
    Notification bar is the best way to highlight the latest topics or  updates of any blog.
    notification bar

    How to add this awsome notification bar to blogger:

    If you add this notification bar to your blogger blog then follow some simple and easy steps in order to add this stylish notification bar to your blog.

    1.Go To Blogger >> Template >>Edit HTML

    2.Now find for ]]></b:skin>:

    3.Now Paste the Below code just above the ]]></b:skin>:


    #notification bar{
    background:black;
    width:auto;
    height:50px;
    z-index: 999999;
    padding:-12px  ;
    margin: -41px 0 0;
    display:none;
    }
    #OIFbar{
    background: none repeat scroll 0 0 #000000;
    background:#05ADFA;
    width:auto;
    height:50px;
    padding:10px auto;
    text-align:center;
    font-family: arial,sans-serif;
    color:black;
    position: relative;
    text-align: center;
    text-decoration: none;
    margin:-10px;
    padding:2px -10px ;
    border-bottom:3px dotted black;
    }
    #OIFbar a{
    color:black;
    font-size:10px;
    font-family: arial,sans-serif;
    }
    #OIFbar hover{
    text-decoration: underline;
    }
     4.Now again go for Template

    5.Now search <body>

    6.After that paste the below code just after <body> tag


    <div id="notification bar">
    <div id="OIFbar"> 
    "ONLINE INFO POINT NOTIFICATION BAR"          
    </div></div>
     7.Now Your'e Done Save Your Template:)

    IF you have any problem while doing this task then feel free and kindly post your problem in comment section.I hope You find this tutorial helpfull 
    If you want to know more OIF Awsome widgets then Subscribe us and Follow us And finally dont forget to share this post with your firends

    Thankyou
    Enjoy!!!

    AUTO SCROLLING RECENT POSTS WIDGET TO BLOGGER


       AUTO SCROLLING  RECENT POSTS WIDGET TO BLOGGER

      So,In this tutorial i will teach you how to add this auto scrolling recent post
      widget in blogger.Scrolling recent posts widget is a great widget to show the recent posts from your blog with scroll effect.As we all know that designing blogger blogs is become easier now and every blogger designe her blog with awsome coding.You also design your blog if you have some knowledge about coding.So in this tutorial I have a great looking Scrolling effect recent posts widget for you which you can easily add to your blogger blogs. It is an awesome widget.and you can easily customize it according to your wish.

      ADDING AND CUSTOMIZATION

      1. Go to blogger >> Layout
      2. Add a Gadget >> Add an HTML/JavaScript Widget
      3. Now just copy all below code and paste it inside HTML/JavaScript Widget


      1. Replace http://www.onlineinfopoint.com/ with "your blog url"
      Thats all save your widget
      If you face any problem while adding this widget kindly leave your comment below so I will help you

      Add stylish subscription widget to your blog

      So in this tutorial i will teach you how to add stylish subscription widget to your blog.As you all know that blog without a subscription box make no sense.I recommend you to keep your blog in a good condition.If you have a subscription box then your blog gain more traffic.you can get any subscription widgets very easily just paste their coding in to your blog.today in this tutorial i have a great looking awesome subscription widget for you which you can add your blogger blog very easily.Adding this stylish subscription widget to your blog is very simple.you may need to follow just simple steps.

      HOW TO add this widget to your blog

      1. Go to blogger >> Layout
      2. Add a Gadget >> Add an HTML/JavaScript Widget
      3. Now just copy all below code and paste it inside HTML/JavaScript Widget


        CUSTOMIZATION

        1. Replace feedburner id with "your feedburner id"
        2. Replace twitter username with "your twitter username"
        3. Replace google plus id with "your google id"
        Thats all save your widget
        If you face any problem while adding this widget kindly leave your comment below so I will help you

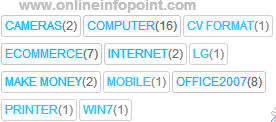
        CHANGE BLOGGER LABEL LINKS WITH BEAUTIFUL BUTTONS USING CSS3

        In this tutorial i am going to teach you how to change blogger label links to beautiful style using css3 code.As we all know that designing blogger blogs is become easier now and every blogger designe her blog with awsome coding.You also design your blog if you have some knowledge about coding.
        follow some simple steps to change the style of label.

        customize blogger label links

        how to change blogger labels links

        1. First go to blogger account 
        2. Go to template/Edit HTML 
        3. Find this code ]]></b:skin> By using CTRL+ key 
        4. Now paste the below code just above the ]]></b:skin>

        1. Now click save template. 
        2. Now add label widget. 

        adding label widget to blogger

        1. Go to layout /ADD A GADGET/and ADD LABEL WIDGET. 
        2. Now select the cloud widget where it say DISPLAY 
        3. Now save your template and you're done.
        Dont forget to subscribe us and sharing this post.
        thanks

        How to Add a Contact Form Widget to Blogger


        CONTACT FORM WIDGET
        In 2013 Blogger Introduced the Beautiful Contact us Widget To Their User.So,in This Tutorials we will learn how to add this beautiful widget  to our blogger blog its very easy just follow few simple steps.
        How to Add a Contact Form Widget to Blogger:

        1.GO TO BLOGGER/LAYOUT/ADD A GADGET/MORE/CONTACT FORM WIDGET


        2.Now rename the title of the widget and once everything is done press “Save” button
        Check out this screen shot for more info

        3.Save your setting and your done congratulation.
        If you have any problem then ask me in comment box
        If you like then share this article and leave comment
        Thanks

        How To Add Facebook Send Button To Blogger

        ADD FACEBOOK SEND BUTTON


        In 2010 Facebook Introduced the facebook like button to help people to share intersting post with all their friend,So in This Tutorials we will learn how to add facebook send button to our blogger blog its very easy just follow few simple steps

        How To Add Facebook Send Button To Blogger Blogs?

        1.GO TO BLOGGER/TEMPLATE/EDIT HTML
        2.SEARCH FOR <data:post.body>
        3.THEN ADD THE BELOW CODE JUST ABOVE <data:post.body> AND FACEBOOK SEND BUTTON WILL APPEAR BELOW YOUR POST TITLE.
         
        <div id="fb-root"></div><script src="http://connect.facebook.net/en_US/all.js#xfbml=1"></script><fb:send href="" font="verdana"></fb:send>
        4.SAVE YOUR TEMPLATE AND YOUR'E DONE

        IF YOU FACED ANY PROBLEM THEN ASK ME IN COMMENT BOX
        HOPE WE WILL HELP YOU
        THANKS